
Page 212 - Computer - 10(A&B)
P. 212
Step 6: Create table: The final step lets you name or rename the table. It also allows you to do one of the
following:
• Insert data immediately: This will open the table, so you can start adding data.
• Modify the table design: This opens the table in design view, so you can add fields or change data
types.
• Create a form based on this table: This will open a blank form document, LibreOffice’s text editor,
and it will launch the Form Wizard.
The Insert the data immediately option will be selected by default. Click the Finish button to insert the
data in the table.
Creating Table using Design View
Design View is a more advanced method for creating a new table, in which you directly enter information about
each field in the table. We will use this method for the tables of our database.
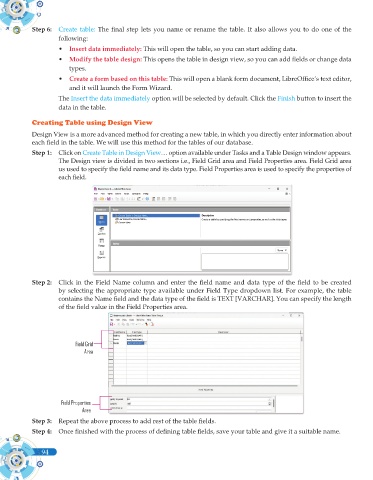
Step 1: Click on Create Table in Design View… option available under Tasks and a Table Design window appears.
The Design view is divided in two sections i.e., Field Grid area and Field Properties area. Field Grid area
us used to specify the field name and its data type. Field Properties area is used to specify the properties of
each field.
Step 2: Click in the Field Name column and enter the field name and data type of the field to be created
by selecting the appropriate type available under Field Type dropdown list. For example, the table
contains the Name field and the data type of the field is TEXT [VARCHAR]. You can specify the length
of the field value in the Field Properties area.
Field Grid
Area
Field Properties
Area
Step 3: Repeat the above process to add rest of the table fields.
Step 4: Once finished with the process of defining table fields, save your table and give it a suitable name.
94