
Page 142 - Computer - 10(A&B)
P. 142
The different buttons on the Track Changes toolbar are as follows:
v Show Track Changes – This button reveals all the changes made to the document by various users.
v Record Track Changes – This button turns on the Track Changes feature. After that, any kind of edits will be
highlighted. The newly added characters to the document will appear in a different colour, while deletions
will be indicated with a strikethrough.
v Previous Track Changes/Next Track Changes – These buttons are used to navigate through the changes
made in the document.
v Accept/Accept All Track Changes – After editing, the original author can approve individual changes
by clicking the Accept Track Changes button, or they can click Accept All Track Changes to accept all
modifications at once.
v Reject/Reject All Track Changes – The original author can choose to dismiss a single change by clicking
Reject Track Changes, or reject all changes at once using the Reject All Track Changes button.
v Manage Track Changes – Clicking this button opens the Manage Changes dialog box, which provides a
comprehensive list of all changes made in the document, including the author’s name, and the date and time
of each modification.
v Insert Comment – This button allows users to add comments within the document.
Preparing a Document for Review
The Track Changes feature is used when you want to share a document for review or editing with one or
more users. Therefore, it is essential to enable this feature before distributing the document to ensure that all
modifications are recorded. This way, once the review process is complete, the original author has the option to
accept or reject the changes made. Thus, before sharing the document, it is important to activate Track Changes.
To activate Track Changes, go to the Edit menu and click the Track Changes arrow. Then, click the Record
button.
To prevent users from disabling the Track Changes option, you can protect the document with a password.
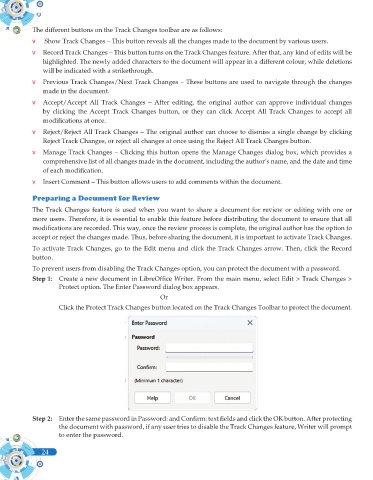
Step 1: Create a new document in LibreOffice Writer. From the main menu, select Edit > Track Changes >
Protect option. The Enter Password dialog box appears.
Or
Click the Protect Track Changes button located on the Track Changes Toolbar to protect the document.
Step 2: Enter the same password in Password: and Confirm: text fields and click the OK button. After protecting
the document with password, if any user tries to disable the Track Changes feature, Writer will prompt
to enter the password.
24