Page 18 - Physics - XI
P. 18
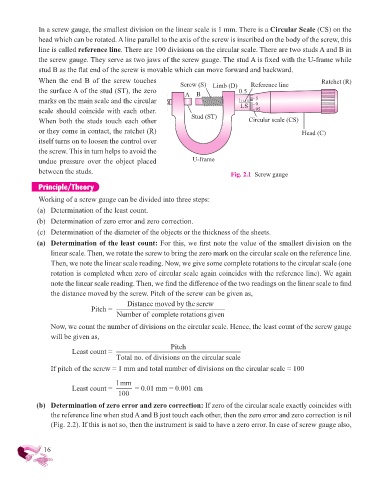
In a screw gauge, the smallest division on the linear scale is 1 mm. There is a Circular Scale (CS) on the
              head which can be rotated. A line parallel to the axis of the screw is inscribed on the body of the screw, this
              line is called reference line. There are 100 divisions on the circular scale. There are two studs A and B in

              the screw gauge. They serve as two jaws of the screw gauge. The stud A is fi xed with the U-frame while
              stud B as the fl at end of the screw is movable which can move forward and backward.
              When the end B of the screw touches             Screw (S)               Reference line          Ratchet (R)
              the surface A of the stud (ST), the zero          A  B     Limb (D)  0.5
              marks on the main scale and the circular                                 5 0
              scale  should  coincide  with  each  other.                         LS   95
              When both the studs touch each other                Stud (ST)          Circular scale (CS)
              or they come in contact, the ratchet (R)                                                 Head (C)

              itself turns on to loosen the control over
              the screw. This in turn helps to avoid the
              undue  pressure  over  the  object  placed          U-frame
              between the studs.                                               Fig. 2.1  Screw gauge

              Principle/Theory

              Working of a screw gauge can be divided into three steps:
              (a)  Determination of the least count.

              (b)  Determination of zero error and zero correction.
              (c)  Determination of the diameter of the objects or the thickness of the sheets.
              (a)   Determination of the least count: For this, we fi rst note the value of the smallest division on the
                  linear scale. Then, we rotate the screw to bring the zero mark on the circular scale on the reference line.
                  Then, we note the linear scale reading. Now, we give some complete rotations to the circular scale (one
                  rotation is completed when zero of circular scale again coincides with the reference line). We again

                  note the linear scale reading. Then, we fi nd the diff erence of the two readings on the linear scale to fi nd
                  the distance moved by the screw. Pitch of the screw can be given as,

                                            Distance moved by the screw
                                Pitch =
                                        Number of complete rotations givven
                  Now, we count the number of divisions on the circular scale. Hence, the least count of the screw gauge
                  will be given as,

                         Least count =                     Pitch
                                        Total no. of divisions on the circular scale
                  If pitch of the screw = 1 mm and total number of divisions on the circular scale = 100


                         Least count =   1 mm   = 0.01 mm = 0.001 cm
                                         100
              (b)   Determination of zero error and zero correction: If zero of the circular scale exactly coincides with
                  the reference line when stud A and B just touch each other, then the zero error and zero correction is nil
                  (Fig. 2.2). If this is not so, then the instrument is said to have a zero error. In case of screw gauge also,


                16

