Page 21 - Physics - XI
P. 21
(ii) Measurement of the Thickness of the Sheet
          10. Now, insert the given sheet between the screw and stud A. Move the screw by rotating the ratchet till

              the sheet is gently gripped between A and B. Stop to move the ratchet when the ratchet slips without
              moving the screw.
          11. Note the number of divisions of the linear scale visible and uncovered by the edge of the cap. The
              reading x is called linear scale reading.
          12. Note which number of division on the circular scale (n) is coinciding with the reference line. The
              product of n and L.C. gives the circular scale reading.

          13. Repeat the steps 10, 11, and 12 for four diff erent positions throughout the surface of the sheet. Record
              the observations in a tabular form.
          14. Take the mean of the observed thickness of the sheet.

          15. Apply zero correction with proper sign to the mean observed thickness to get corrected the thickness
              of the sheet.

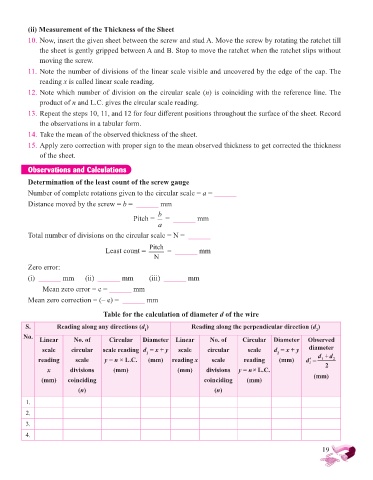
          Observations and Calculations
          Determination of the least count of the screw gauge

          Number of complete rotations given to the circular scale = a = ______
          Distance moved by the screw = b =  ______ mm
                                                      b
                                               Pitch =   =  ______ mm
                                                      a
          Total number of divisions on the circular scale = N =  ______


                                         Least count =   Pitch   =  ______ mm
                                                     N
          Zero error:

          (i)  ______ mm      (ii)  ______ mm      (iii)  ______ mm
               Mean zero error = e = ______ mm
          Mean zero correction = (– e) =  ______ mm

                                    Table for the calculation of diameter d of the wire

          S.        Reading along any directions (d )             Reading along the perpendicular direction (d )
                                                  1
                                                                                                            2
         No.   Linear     No. of      Circular   Diameter   Linear      No. of     Circular  Diameter    Observed
               scale     circular   scale reading  d  = x + y  scale   circular      scale    d  = x + y  diameter
                                                  1                                            2            d + d
              reading      scale    y = n × L.C.   (mm)    reading x     scale     reading     (mm)     d i      1  2  2
                 x       divisions     (mm)                  (mm)      divisions   y = n× L.C.
               (mm)     coinciding                                    coinciding    (mm)                   (mm)
                           (n)                                           (n)

          1.
          2.
          3.

          4.

                                                                                                              19

