Page 19 - Physics - XI
P. 19
zero error may be positive or negative. Negative of zero error is called zero correction which is always
               added algebraically to the observed reading to obtain the corrected reading.

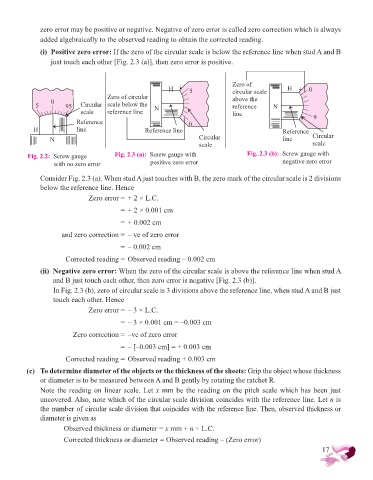
               (i)   Positive zero error: If the zero of the circular scale is below the reference line when stud A and B
                  just touch each other [Fig. 2.3 (a)], then zero error is positive.


                                                                                Zero of
                                                          H      5              circular scale    H      0
                                     Zero of circular                           above the
                  0
             5         95   Circular   scale below the   N                      reference    N
                            scale    reference line                             line
                           Reference                             0                                          6
            H              line                   Reference line                                Reference
                  N                                                 Circular                    line       Circular
                                                                    scale                                  scale
          Fig. 2.2:  Screw gauge        Fig. 2.3 (a):  Screw gauge with             Fig. 2.3 (b):  Screw gauge with
                   with no zero error               positive zero error                         negative zero error
               Consider Fig. 2.3 (a). When stud A just touches with B, the zero mark of the circular scale is 2 divisions
               below the reference line. Hence

                               Zero error = + 2 × L.C.
                                          =  + 2 × 0.001 cm

                                          =  + 0.002 cm
                      and zero correction = – ve of zero error

                                          =  – 0.002 cm

                       Corrected reading = Observed reading – 0.002 cm
               (ii)   Negative zero error: When the zero of the circular scale is above the reference line when stud A
                   and B just touch each other, then zero error is negative [Fig. 2.3 (b)].
                     In Fig. 2.3 (b), zero of circular scale is 3 divisions above the reference line, when stud A and B just
                   touch each other. Hence
                               Zero error = – 3 × L.C.

                                          =  – 3 × 0.001 cm = –0.003 cm

                          Zero correction = –ve of zero error
                                          =  – [–0.003 cm] = + 0.003 cm

                       Corrected reading = Observed reading + 0.003 cm
          (c)  To determine diameter of the objects or the thickness of the sheets: Grip the object whose thickness
               or diameter is to be measured between A and B gently by rotating the ratchet R.
               Note the reading on linear scale. Let x mm be the reading on the pitch scale which has been just
               uncovered. Also, note which of the circular scale division coincides with the reference line. Let n is
               the number of circular scale division that coincides with the reference line. Then, observed thickness or
               diameter is given as
                       Observed thickness or diameter = x mm + n × L.C.

                       Corrected thickness or diameter = Observed reading – (Zero error)
                                                                                                              17

