Page 13 - Physics - XI
P. 13
7.  Repeat the observations for the diameter at least three times for three diff erent positions of the spherical
              body or cylindrical body. Record the observations in the table.

          8.  To obtain the corrected diameter, subtract the zero error algebraically from the observed diameter.
          (ii) Measurement of Internal Diameter of a Calorimeter

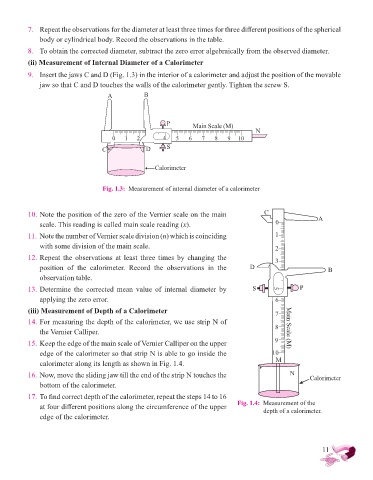
          9.  Insert the jaws C and D (Fig. 1.3) in the interior of a calorimeter and adjust the position of the movable
              jaw so that C and D touches the walls of the calorimeter gently. Tighten the screw S.
                                     A            B


                                                         P        Main Scale (M)
                                                                                       N
                                       0   1   2        4   5    6   7    8   9  10
                                    C             D      S


                                                     Calorimeter


                                    Fig. 1.3:  Measurement of internal diameter of a calorimeter


          10. Note the position of the zero of the Vernier scale on the main              C                  A
              scale. This reading is called main scale reading (x).                           0

          11. Note the number of Vernier scale division (n) which is coinciding               1
              with some division of the main scale.                                           2
          12. Repeat the observations at least three times by  changing the                   3
              position  of  the  calorimeter.  Record  the  observations  in  the    D                          B

              observation table.
          13. Determine  the  corrected  mean  value  of  internal  diameter  by      S       5       P
              applying the zero error.                                                        6
          (iii) Measurement of Depth of a Calorimeter                                         7

          14. For measuring the depth of the calorimeter, we use strip N of
              the Vernier Calliper.                                                           8   Main Scale (M)
          15. Keep the edge of the main scale of Vernier Calliper on the upper                9
              edge of the calorimeter so that strip N is able to go inside the               10

              calorimeter along its length as shown in Fig. 1.4.                              M
          16. Now, move the sliding jaw till the end of the strip N touches the                    N      Calorimeter
              bottom of the calorimeter.
          17. To fi nd correct depth of the calorimeter, repeat the steps 14 to 16

              at four diff erent positions along the circumference of the upper   Fig. 1.4:  Measurement of the
                                                                                          depth of a calorimeter.

              edge of the calorimeter.


                                                                                                              11

