Page 27 - Physics - XI
P. 27
EXPERIMENT - 4

          Aim

          To determine radius of curvature of a given spherical surface by a spherometer.

          Apparatus and Materials Required

          A spherometer, a plane glass plate, a spherical surface (convex mirror), and a pencil

          Description of the Measuring Device
          Spherometer is a device which measures the radius of curvature of a spherical surface.

                                                         N
                                        P  10     10    30  40  D   Circular scale/disc
                                          0    0 90 80 70 60 50
                                          10                       F
                                               Screw    S
                                                                  A
                                                       V
                                        B
                                                r
                                                      O

                                                                C


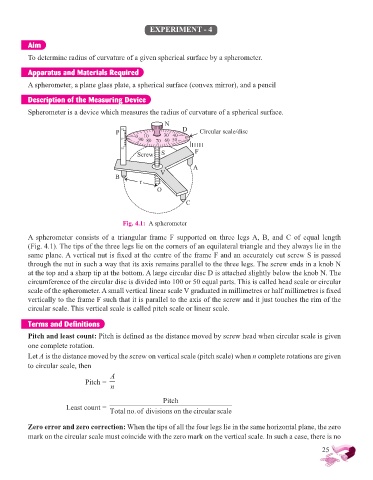
                                               Fig. 4.1:  A spherometer

          A  spherometer  consists  of  a  triangular  frame  F  supported  on  three  legs A,  B,  and  C  of  equal  length
          (Fig. 4.1). The tips of the three legs lie on the corners of an equilateral triangle and they always lie in the
          same plane. A vertical nut is fi xed at the centre of the frame F and an accurately cut screw S is passed
          through the nut in such a way that its axis remains parallel to the three legs. The screw ends in a knob N
          at the top and a sharp tip at the bottom. A large circular disc D is attached slightly below the knob N. The
          circumference of the circular disc is divided into 100 or 50 equal parts. This is called head scale or circular
          scale of the spherometer. A small vertical linear scale V graduated in millimetres or half millimetres is fi xed
          vertically to the frame F such that it is parallel to the axis of the screw and it just touches the rim of the
          circular scale. This vertical scale is called pitch scale or linear scale.

          Terms and Definitions

          Pitch and least count: Pitch is defi ned as the distance moved by screw head when circular scale is given
          one complete rotation.
          Let A is the distance moved by the screw on vertical scale (pitch scale) when n complete rotations are given
          to circular scale, then
                                      A
                              Pitch =
                                      n

                                                        Pitch
                       Least count =
                                      Total no. of divisions on the circular scale

          Zero error and zero correction: When the tips of all the four legs lie in the same horizontal plane, the zero
          mark on the circular scale must coincide with the zero mark on the vertical scale. In such a case, there is no

                                                                                                              25

